|
Newel Post Installation Kit (Order 1 Kit per Newel Post) Melton Classics has developed separate installation kits for wood and concrete so please specify when ordering.
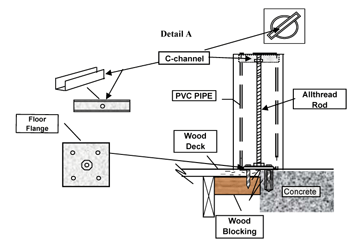 Wood Kit C-channel Wood Kit C-channel
- One Floor Flange
- Four 3/8″ x 2 1/2″ lag bolts.
- One 1/2″ x 54″ threaded rod.
- One “C”-channel.
- One 1/2″ nut and lock washer.
Concrete Kit
- One Floor Flange
- Four concrete anchors & bolts.
- One 1/2″ x 54″ threaded rod.
- One C-channel.
- One 1/2″ nut and washer.
|
|
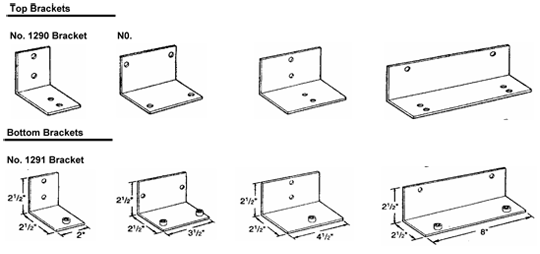
Railing Installation Kits (Order 1 Kit per Top & Bottom Rail Section)
Railing Installation Kits
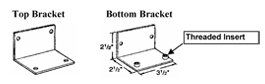
- Two pre-punched aluminum angle brackets.
- Two pre-punched aluminum angle brackets with threaded inserts.
- Eight 1/4″ x 2 ” machine bolts w/nuts, flat washers, and lock washers.
- Four or eight #14 x 2″ self tapping screws.
- Two or Four 5/16″ x 1 1/2″ hex head bolts.
Note: Quantities may vary depending on kit.
|
|
Newel Post Installation Melton Classics has developed separate installation kits for Wood Decks and Concrete.
- Wood Deck Installation
- Locate the center point for each newel post and floor flange.
- Make sure to install blocking under floor flange areas.
- Secure floor flanges in place with 3/8″ lag bolts.
- Concrete Installation
- Locate the center point for each newel post and floor flange.
- Make sure concrete is fully cured before drilling anchor holes.
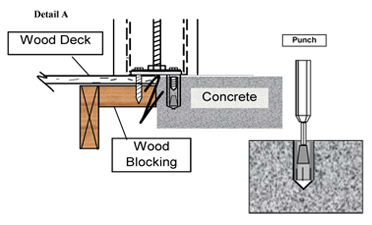
- Mark out anchor holes in floor flange. Drill 3/8″ hole 1 1/4″ deep.
- Insert anchor and set anchor pin using a punch. (See Detail B)
- Secure floor flanges in place with anchor bolts.
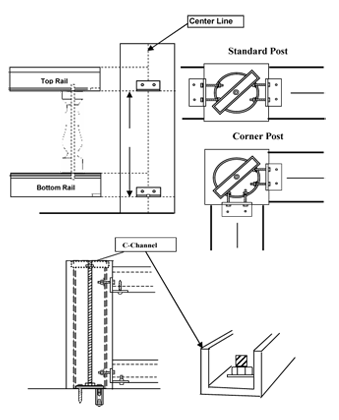
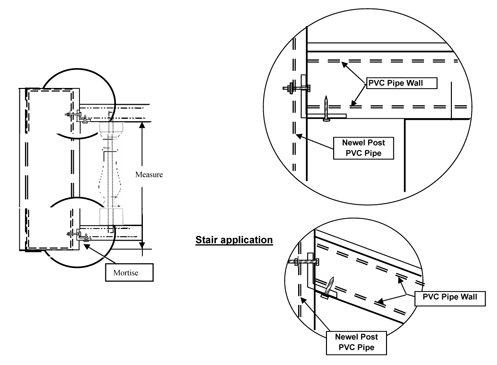
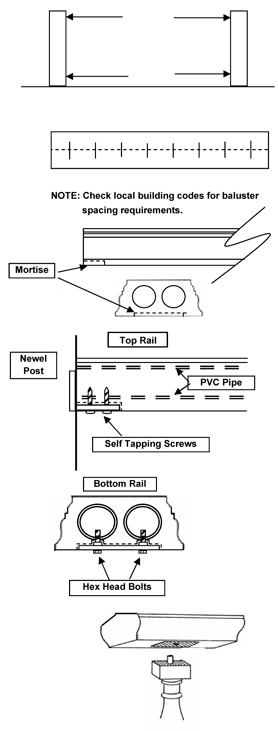
- Measure the height of the baluster and height of the bottom rail. This is the distance between the bottom of the angle brackets to be located on the newel post. Mark out the location and the height of the bottom rail from the deck or concrete pad. Using the measurement of the baluster and bottom rail locate the bottom of the top bracket. Mark out the top and bottom bracket on the newel post. Mortise the newel post so the face of the angle brackets mount flush with the face of the newel post. Drill the holes for the 1/4″ bolts and secure the angle brackets in place.
- Put the newel post in place over the floor flange and screw in the 1/2″ allthread rod into the nut welded to the floor flange. Put the C-channel in place and secure loosly with the nut and lock washer.
|
|
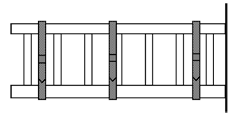
Railing Preparation & Installation
- Measure the distance between newel posts and cut rails to length. NOTE: Make sure to take measurements from both the top and bottom of the newel post before cutting rail.
- Lay out the spacing for the balusters and drill both the top and bottom rails. See the (Baluster Specification Sheet) for hole size. Note: For rails with PVC pipe a standard wood boring hole saw or spade bit work well. For rails with galvanized metal pipe drill a pilot hole then follow with a cone bit or metal boring drill bit. NOTE: Check local building codes for baluster spacing requirements.
- Mortise the bottom end of each rail so the angle brackets will mount flush with the bottom of the railswhen installed.
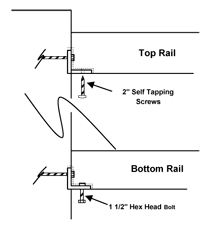
- Set Bottom and top rails in place. Mark locations for threaded insert and hex head bolt.
 |
 |
|
Rail & Baluster Assembly
- Using a 36 grit sand paper, rough up the top and bottom of the balusters to expose the cellular urethane core. Repeat the same step on the top and bottom rails around the holes for the balusters. This provides the best possible surface for urethane adhesive to work properly.
- Apply urethane adhesive to roughed up areas so adhesive will squeeze out to the edge of the balusters.
- Assemble a complete section of top and bottom rail. Wrap 3 nylon strap clamps around the top and bottom rail. Tighten pulling the all the joints together tightly. Make sure the system is square and not tilted.
- Set assembled rails into place and secure with 2″ self tapping screws through the top bracket.
|
 |
|
|
|
|