It is the responsibility of the installer to meet or exceed all code and safety requirements, and to obtain all required building permits. These instructions are only a guide and may not address every circumstance. The deck and railing installer should determine and implement appropriate installation techniques for each situation. Melton Classics™ shall not be held liable for improper or unsafe installations.
 Step 1 Safety Precautions
Check all local building codes for design load requirements.
VinylClassics™ Balustrades are manufactured to the standards outlined in ASTM F964 and has been structurally tested to meet requirements for Guardrail installations as outlined for pertaining IRC (Residential) and IBC (Commercial) applications as documented.
Always use safety equipment when installing these products.
Step 2 Mounting Surface Preparation
Make sure all mounting surfaces are plumb. If using a Round Column, make sure to use a Round Column Adapter. When using a Square or Recessed Panel Newel Post Sleeve, pad wood post out to fit the inside of post sleeve or you may use our Stainless Steel Structural Post (see Figure 2). Slide sleeve over post and slide base trim ring in place.
 Step 3 Cut Top And Bottom Rails
With post plumb, measure the distance between posts where rail brackets will mount. Lay rails on a flat non-abrasive surface. Using the measurement between posts as a reference, measure the bottom rail, allowing equal and maximum distance between end of rail and baluster. Make sure you have a minimum of 1″ from end of rail to baluster. With layout complete, mark where rails will be cut. You may mark both top and bottom rails at one time. You may cut both aluminum and vinyl at the same time using a saw with a fine tipped carbide saw blade (see manufacturer specs for saw blade).
 Step 4 Assemble Rail And Mounting Brackets
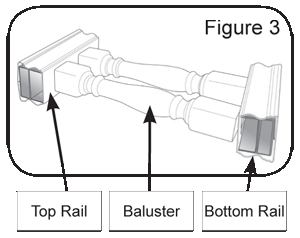
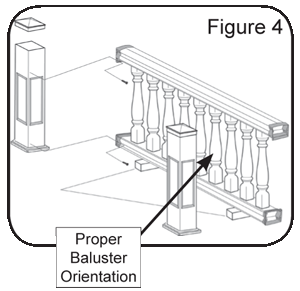
With rail cut to length, insert balusters in bottom rail. Widest part of turned baluster goes into bottom rail (see Figure 3). With all balusters in bottom rail, hold top rail at an angle and start to insert balusters into top rail. Using two straps or cord wrap around rail section and tie off to hold rail together when moving in place. Slide brackets on ends of rail section (two bottom and two top brackets). If mounting bracket covers baluster cut out, you may cut out up to 1″ of the mounting bracket flange, using a coping saw or saber saw, to allow baluster to seat into rail. Using scrap lumber, cut two 2″ blocks and lay 8″ away from post so bottom rail will rest on blocks to allow proper space between deck and rail (see Figure 4).
 Step 5 Mount Railing To Post
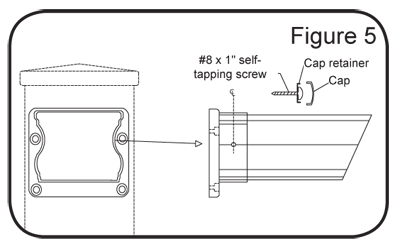
With rail assembled, mounting brackets placed on rail ends, set rail in between post on top of 2″ blocks. Next, center mounting brackets on newel post. Drill a 5/32″ hole through mounting bracket screw holes (four per bracket) into post and install four (4) mounting bracket screws on all (4) brackets. With all brackets screwed in place, you will need to install a screw, washer and white cap through each bracket into the rails. Drill a 1/8″ hole on the side of the mounting bracket (see Figure 5). On one side of both Top and Bottom mounting brackets install one (1) #8 x 1″ self-tapping screw with clear plastic cap retainer. Snap cap over screw to cover screw head. NOTE: do not over tighten screw, the retainer may “cup” and the cap will not snap on.
Step 6 Install Post Caps
With railing screwed in place, you are ready to install post caps. If you need to trim the tops of newel posts you may do this now. To install post caps, apply PVC cement or Silicone Caulk to the inside lip of cap and seat in place.
Step 7 Cleanup
You may clean up your vinyl railing with a mild household cleaner.
For any stubborn stains, use #0000 steel wool and mild household cleaner.